
Arena Footing Systems
Install Your Own Performance Arena Footing: A Step-by-Step Guide
Performance Footing · October 1, 2026 · 15 min read
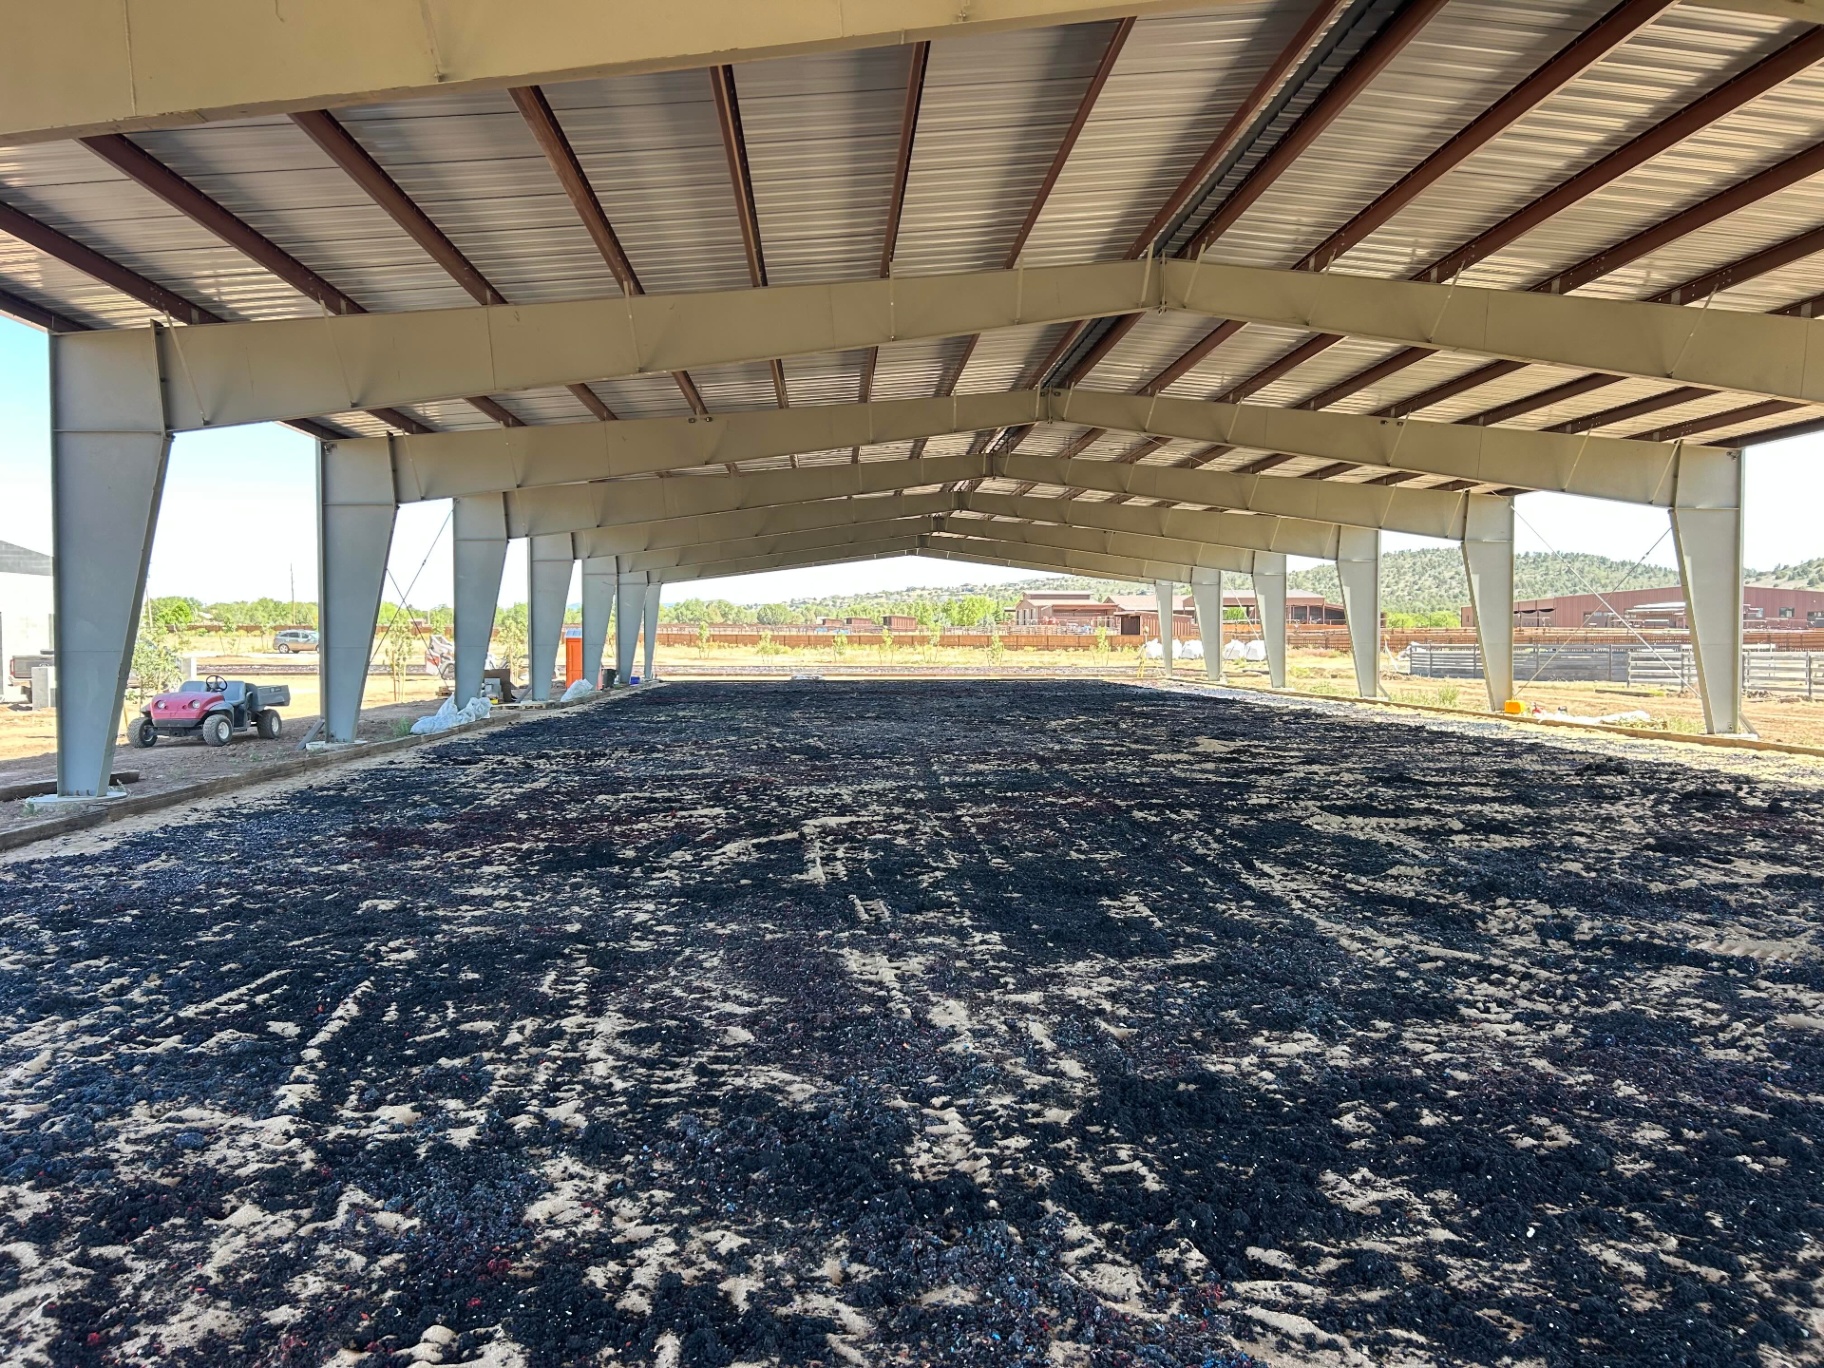
Learn how to install professional-quality arena footing yourself. Step-by-step guide covers base prep, geocell installation, and custom footing blends for optimal horse performance.
Research published in the Equine Veterinary Journal confirms that arena surface characteristics directly influence peak vertical loading forces on equine limbs—with poorly constructed surfaces increasing injury risk by up to 30% compared to professionally engineered footing systems. For horse owners considering a DIY arena footing installation, understanding the correct layer sequence, material specifications, and installation techniques is the difference between a surface that protects your horse and one that compromises soundness.
Installing arena footing yourself requires building five distinct layers from the ground up: a compacted subgrade, optional drainage stone, geotextile separation fabric, geocell stabilization panels, and a custom sand footing blend specified to your discipline, climate, and usage patterns. Each layer serves a specific biomechanical and drainage function—skip or misorder any component, and you'll create conditions that lead to inconsistent footing, poor drainage, and potential lameness issues.
Performance Footing has guided thousands of arena owners through this exact process, from initial site assessment through final footing installation. This guide walks you through the complete DIY installation sequence, specifying depths, materials, and techniques that deliver professional-grade results without professional-grade costs. You'll learn the correct arena stack order, how to select and install each component, and the critical mistakes that derail even well-intentioned projects.
The Science Behind Arena Surface Engineering
Arena footing isn't simply sand spread over dirt—it's a precision-engineered system designed to manage three competing demands: impact absorption, traction stability, and drainage efficiency. Understanding the science helps you make smarter installation decisions.
Dr. Mick Peterson, director of the Racing Surfaces Testing Laboratory at the University of Kentucky, has documented how surface shear strength directly affects hoof breakover mechanics. Footing that's too loose delays breakover, stressing the deep digital flexor tendon. Footing that's too firm increases concussive loading through the distal limb. The goal is a surface that provides consistent resistance through the stride cycle—something only achievable when the entire arena stack works as an integrated system.
The base layer determines long-term stability. Research from the Swedish University of Agricultural Sciences by Dr. Lars Roepstorff demonstrates that base inconsistencies translate directly to footing inconsistencies above—a finding that explains why arenas built on native soil without proper stabilization develop ruts, soft spots, and drainage failures within 2-3 years.
Geocell technology addresses this by confining fill material into a three-dimensional honeycomb matrix. When loaded, each cell transfers forces laterally to adjacent cells, distributing point loads across a wide area. This load distribution is why a 3-inch geocell system can support horse traffic on soils that would otherwise require 8-12 inches of compacted aggregate. The BaseCore™ Geocell system uses this principle specifically for equestrian applications, with cell dimensions optimized for the dynamic loading patterns of horses at all gaits.
Drainage engineering matters equally. Water trapped in the footing profile degrades sand particle binding, creates anaerobic conditions that kill beneficial microbes, and during freeze-thaw cycles, heaves the surface into an unrideable moonscape. Proper drainage requires both permeability through the footing layer and evacuation capacity beneath—functions served by the geotextile membrane and any underlying drainage stone.
Understanding the Correct Arena Stack Sequence
The single most common DIY installation mistake is layer misordering. The canonical arena ground stack, from top to bottom, is:
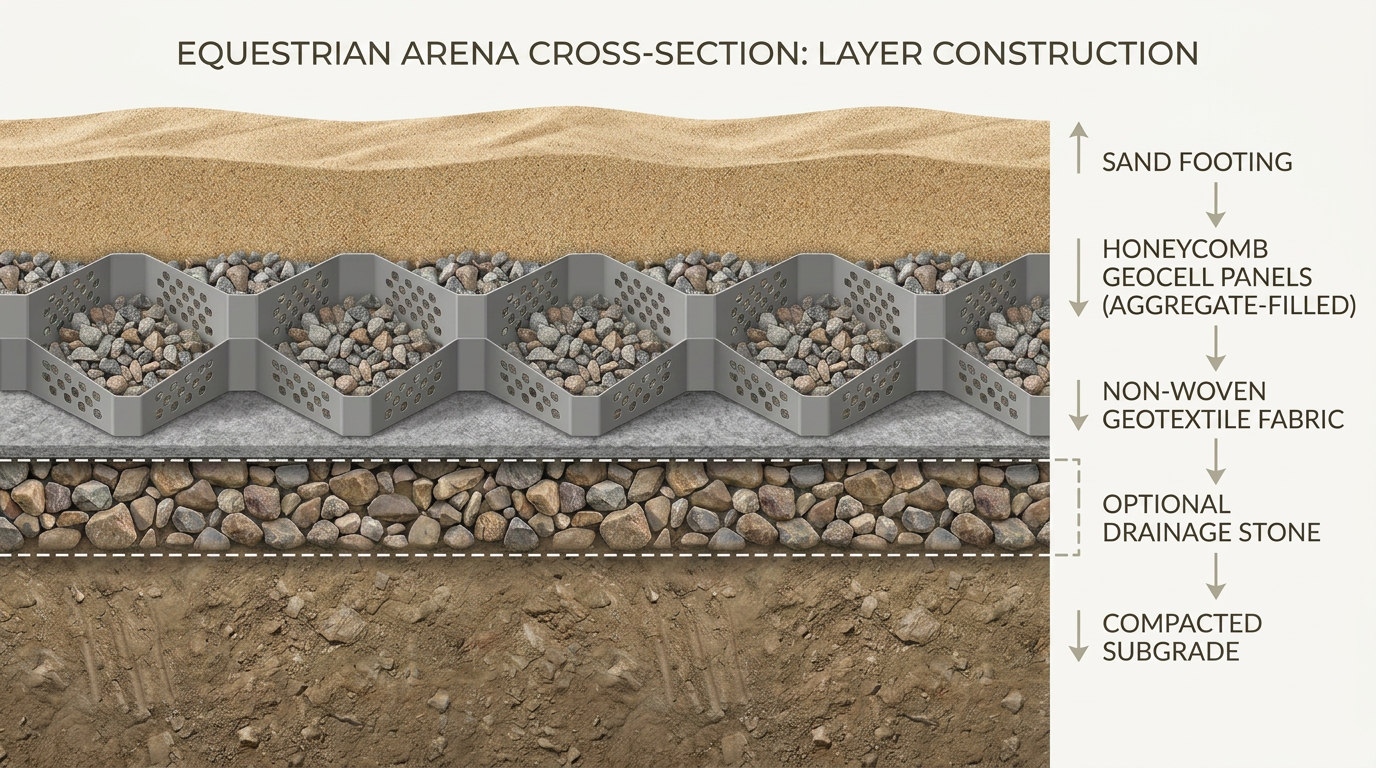
A properly engineered arena requires a precise sequence of five distinct layers to ensure optimal drainage and support.
Custom sand footing blend—a discipline-specific, climate-appropriate footing layer at 2 inches minimum depth, adjusted based on your specific requirements
BaseCore HD geocell mats—the structural base that provides load distribution and prevents migration
Geotextile separation fabric—installed directly under the geocell mats to prevent fines migration while allowing water passage
Optional engineered subbase/drainage stone—only where site conditions require enhanced drainage, always positioned below the geotextile
Compacted subgrade—prepared native soil graded to proper slope specifications
This sequence is non-negotiable. The geotextile membrane must sit directly under the geocell—never beneath drainage stone or aggregate. Placing geotextile under a stone layer defeats its separation function and creates a failure plane where fines accumulate, eventually clogging the fabric and destroying drainage capacity.
Many DIY guides incorrectly specify the geotextile beneath aggregate bases or worse, under the footing layer. This error stems from road construction practices that don't translate to arena applications. Horse arenas experience dynamic, concentrated loading patterns that road engineering doesn't address. The Performance Footing system positions each layer for equestrian-specific performance.
Site Assessment and Preparation
Before purchasing any materials, conduct a thorough site assessment. This evaluation determines whether your site can support a standard installation or requires additional drainage engineering.
Soil Evaluation
Dig test holes at each corner and the center of your proposed arena footprint, excavating to 18 inches. Note soil composition at each depth. Clay-heavy soils require more aggressive drainage solutions; sandy native soils may allow simplified installations.
Perform a percolation test: fill each hole with water and time how long complete drainage takes. Results guide drainage design:
Under 30 minutes: Excellent native drainage—standard installation typically sufficient
30-60 minutes: Moderate drainage—consider perimeter French drains
Over 60 minutes: Poor drainage—engineered subbase with drainage stone likely required
Grade and Slope Planning
Arena surfaces require 1-2% cross-slope for drainage—approximately 1 inch of fall per 8 feet of width. Steeper slopes create runoff patterns that move footing material; flatter slopes allow water pooling.
Use a laser level or transit to establish elevation benchmarks at each corner. Calculate the cut-and-fill requirements to achieve proper slope while maintaining your desired final arena elevation. For most residential arenas, orienting the slope perpendicular to the arena's long axis provides the most efficient drainage path.
Subgrade Preparation
Strip all vegetation, topsoil, and organic material from the arena footprint plus 2 feet beyond each edge. Organic material trapped beneath the arena decomposes, creating voids that cause surface settling.
Cut high areas and fill low areas using native soil or clean fill. Compact in 4-inch lifts using a vibratory plate compactor, achieving minimum 95% Standard Proctor density. Each pass should overlap the previous by 50%.
Final subgrade should be smooth, firm, and graded to your specified slope. Walk the surface—any areas that feel soft or spongy require additional compaction or soil replacement.
Not sure about your site conditions? Performance Footing's team can review site photos and soil reports to recommend the right installation approach for your property. Request a quick quote or call 877-835-0878 for a consultation.
Installing the Drainage Layer (If Required)
Sites with poor native drainage or high water tables require an engineered drainage layer beneath the geotextile membrane. This layer evacuates water that percolates through the footing, preventing saturation that destroys surface performance.
When to Include Drainage Stone
Include a drainage layer when:
Percolation tests exceed 60 minutes
Seasonal high water table reaches within 24 inches of finished grade
Clay content exceeds 40% in native soil
Arena location sits in a natural drainage path or low area
Materials and Installation
Use clean, washed 3/4-inch to 1-inch angular stone—never river rock or round stone, which lacks the interlocking properties needed for stable support. Crusite, limestone, and granite all work well; avoidite soft stones that break down under load.
Spread stone in 4-inch lifts, compacting each lift before adding the next. Total drainage layer depth typically ranges from 4-8 inches depending on site conditions. Maintain your established 1-2% slope through the drainage layer—this slope is critical for moving water toward your collection point.
Install perimeter collection drains if your site requires active drainage. French drains with 4-inch perforated pipe, wrapped in filter fabric, collect water at the low edge and convey it to a suitable outlet—daylight, dry well, or storm system connection depending on your property.
Geotextile Installation
The geotextile separation fabric prevents fine particles from migrating between layers while allowing water to pass freely. This dual function preserves the structural integrity of the geocell layer above and prevents clogging of any drainage stone below.
Material Selection
Use a non-woven geotextile rated for separation applications, minimum 4 oz/sq yd weight. Woven geotextiles don't provide adequate filtration for arena applications—the tight weave allows fines passage and clogs quickly.
Performance Footing's geotextile is specifically rated for equestrian use, with filtration properties matched to typical arena sand gradations. This matching prevents both clogging (fabric too tight) and fines migration (fabric too open).
Installation Steps
Roll geotextile directly over your prepared subgrade or drainage stone layer. Overlap seams by minimum 12 inches—18 inches in high-traffic areas. On sloped installations, lay fabric with the overlap direction following water flow (downstream panel on top) to prevent water from lifting seams.
Secure fabric at edges using landscape staples every 3 feet. In windy conditions, weight the fabric with spare geocell panels or sand bags while working to prevent billowing and displacement.
Extend fabric 6 inches beyond your arena perimeter, tucking under any edge restraint system. This prevents lateral erosion and keeps the layer system intact at the boundaries.
BaseCore Geocell Installation
The BaseCore™ Geocell layer transforms your prepared subgrade into a stable, load-distributing platform that prevents footing migration, rut formation, and base failure. Standard arena specification is 3-inch BaseCore HD panels.
Panel Layout Planning
BaseCore panels expand from a collapsed shipping configuration into a honeycomb grid. Plan your layout before opening panels—once expanded, they're difficult to collapse and reposition.
Start at one corner, orienting the first panel parallel to the arena's long edge. Panels connect via integral J-hooks that snap between adjacent cells. Work in rows, completing each row before starting the next to maintain alignment.
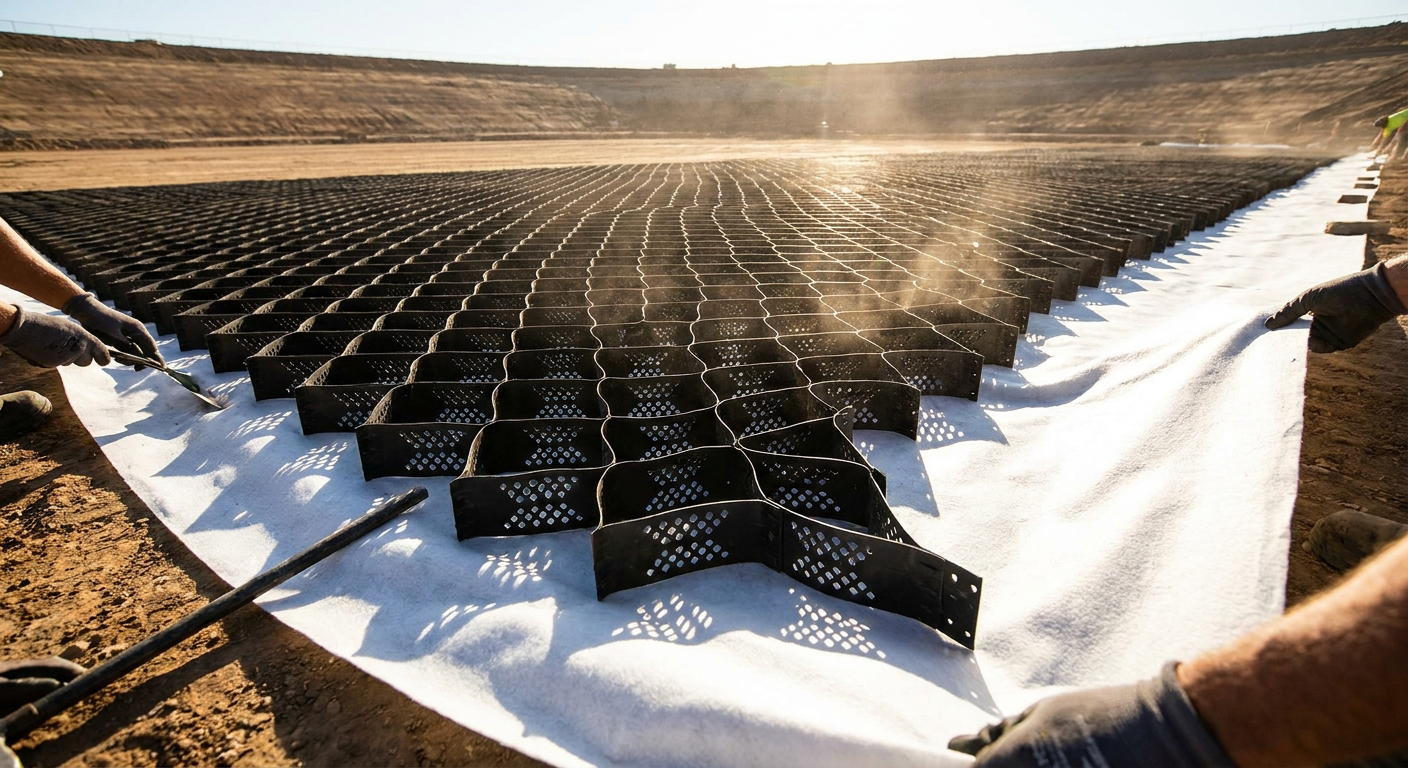
Expanding and connecting geocell panels creates a stable matrix that prevents shifting and rutting.
At edges, trim panels to fit using a utility knife or reciprocating saw. Leave 1/2-inch gap between panels and any rigid edge restraint to accommodate thermal expansion.
Filling the Cells
Fill cells with clean, angular aggregate—typically 3/8-inch to 3/4-inch crushed stone. Round material or sand won't lock properly within the cell structure and defeats the load distribution function.
Dump aggregate in small piles across the panel area, then spread using a landscape rake or the back of a skid steer bucket. Work material into all cells, ensuring complete fill without voids. The fill surface should be flush with cell tops—overfilling creates high spots; underfilling allows cells to flex excessively.
Compact the filled geocell using a vibratory plate compactor. Make two passes minimum, checking for any cells that settle and require additional fill.
Alternative: PaveCore for High-Traffic Zones
For arena entrances, mounting blocks, and warm-up track intersections that see concentrated traffic, PaveCore provides enhanced load distribution. This heavier-duty geocell handles the additional stress of repeated loading in fixed locations where standard BaseCore might experience accelerated wear.
Edge Containment Installation
Arena edges require restraint to prevent footing migration and maintain clean boundaries. Without proper edge containment, footing gradually migrates outward, depth decreases, and the perimeter becomes an unrideable transition zone.
Steel edging provides the most durable containment for arenas. Install edging after geocell placement but before footing application.
Installation Process
Set edging in a shallow trench along the arena perimeter, with the top edge at your planned finished footing height. Drive stakes every 4 feet on the outside face, angling stakes outward slightly to resist the lateral pressure of footing material.
At corners, use factory corner pieces or field-cut miters. Seal any gaps with landscape fabric scraps to prevent fines loss.
For arenas without steel edging, timber boards (minimum 2x6 pressure-treated) or recycled plastic lumber provide acceptable alternatives. These materials require more frequent replacement but cost less upfront.
Custom Footing Blend Selection and Application
The footing layer is where discipline-specific customization becomes critical. A dressage arena requires different surface characteristics than a reining pen or jump arena. Climate, indoor versus outdoor placement, and usage intensity all influence the optimal blend.
The Sand-First Approach
Quality footing begins with quality sand. Not all sand works for arena applications—concrete sand, masonry sand, and beach sand all fail for different reasons. Arena sand requires specific particle size distribution, angular grain shape, and minimal fines content.
Performance Footing recommends starting every project with a sieve analysis of available local sand sources. This laboratory test characterizes particle size distribution, revealing whether a sand source will pack too tight, drain too fast, or generate excessive dust. The arena sand calculator helps estimate quantities once you've identified your sand source.
Footing Depth by Discipline
Footing depth varies by discipline and intended use:
Dressage: 2-3 inches—firmer surface supports collection and precise footwork
Jumping: 3-4 inches—additional depth absorbs landing impact
Reining/Western: 3-4 inches—deeper surface allows sliding stops
General purpose: 3 inches—balanced depth for mixed use
These depths assume properly stabilized base construction. Arenas without geocell stabilization require deeper footing to compensate for base inconsistency—a false economy that increases material costs and maintenance burden.
ArenaSpec Additive Integration
Raw sand rarely provides optimal performance without additives. The ArenaSpec system offers targeted solutions based on your specific needs:
FIBR (Structural Matrix) adds shear strength and traction through plant-based natural fibers that bind within the sand profile. This biodegradable additive prevents the sand from simply displacing under hoof impact.
LOCK (Dust & Moisture Controller) suppresses dust and regulates moisture using plant-oil-based compounds. Unlike water-based dust control that evaporates and requires constant reapplication, LOCK provides extended performance without creating slippery or gummy conditions.
HOLD+ (Moisture & Traction Buffer) uses natural minerals to buffer moisture swings, maintaining consistent firmness regardless of weather changes. This is particularly valuable for outdoor arenas that experience rain, humidity fluctuations, and seasonal changes.
FLEX (Comfort & Rebound Module) adds cushion and impact absorption for high-impact disciplines using engineered, UV-stable elastomers. Jump arenas and reining pens benefit most from this component.
ArenaSpec products can be applied individually to address specific problems or combined as a system for comprehensive performance. Performance Footing specifies the appropriate products and application rates based on your sieve analysis results, discipline, and climate.
Footing Application
Deliver sand to the arena in manageable loads, spreading each load before the next delivery. This prevents compaction from truck traffic and allows quality control as material goes down.
Spread using a box blade, landscape rake, or the Arena Drag in reverse configuration. Work in overlapping passes, checking depth with a probe or tape measure every 10 feet.
After initial spreading, make a full pass with your drag implement to level the surface and begin integrating any additives. Let the surface rest for 24-48 hours before heavy use, allowing any moisture to equilibrate through the profile.
Ready to specify your custom footing blend? Performance Footing's team can recommend the right ArenaSpec components for your discipline, climate, and performance goals. Call 877-835-0878 or contact us for a personalized recommendation.
Post-Installation Setup and Break-In
A newly installed arena requires a break-in period before it performs optimally. The footing needs to settle, additives need to integrate, and you need to establish baseline maintenance routines.
Initial Conditioning
During the first two weeks, work the arena daily at all gaits. This conditioning process helps footing settle into a consistent density and reveals any installation issues (thin spots, drainage problems, base irregularities) while they're still easy to correct.
Add water during break-in to help additives bind and fibers integrate. The surface should be damp but not wet—if hoofprints fill with standing water, reduce irrigation.
Establishing Maintenance Routines
Even perfectly installed arenas require ongoing maintenance. Plan for:
Dragging: After every 4-6 riding sessions to redistribute footing and prevent track formation
Moisture management: Consistent watering schedule based on climate and usage (or ArenaSpec LOCK for reduced water dependence)
Depth monitoring: Monthly depth checks at multiple points to identify migration or compaction
Edge maintenance: Quarterly inspection of containment systems and correction of any material buildup
The Arena Drag and Equi Groomer are designed specifically for these maintenance tasks, with tine configurations that condition footing without over-processing or destroying fiber distribution.
Common Installation Mistakes to Avoid
Learning from others' mistakes saves time, money, and frustration. These are the most frequent DIY installation errors Performance Footing's team encounters:
Skipping the geotextile: Without separation fabric, fines migrate from footing into the base, clogging drainage and creating an unstable layer that shifts under load. This is an invisible failure—the arena looks fine initially but deteriorates rapidly.
Wrong layer sequence: Placing geotextile under drainage stone instead of directly under geocell defeats its separation function. Water carries fines to the geotextile surface, where they accumulate and eventually seal the fabric.
Inadequate compaction: Uncompacted subgrade or base layers settle unevenly, creating depressions that collect water and cause footing inconsistency. Take time to compact properly—this isn't where to save hours.
Using construction-grade sand: Concrete sand, masonry sand, and fill sand lack the particle characteristics needed for footing. They either pack too tight (poor drainage, hard surface) or stay too loose (poor traction, excessive depth). Insist on a sieve analysis before accepting any sand source.
Insufficient depth: Trying to save money with 1-1.5 inches of footing over geocell creates a surface that rides hard and wears quickly. Maintain minimum 2-inch depth, adjusting upward for your discipline.
Ignoring drainage: An arena that can't drain becomes an arena you can't use. If your site has any drainage concerns, address them during construction—retrofitting drainage is exponentially more expensive and disruptive.
How deep should arena footing be for DIY installation?
Arena footing depth for DIY installations should be 2-4 inches depending on discipline, with 3 inches serving most general-purpose needs. Dressage arenas perform well at 2-3 inches, while jumping and reining disciplines benefit from 3-4 inches. These depths assume proper BaseCore geocell base installation—without a stabilized base, you'll need deeper footing to compensate for base inconsistency, increasing both initial cost and maintenance burden.
Can I install arena footing without professional help?
Yes, competent DIY installers can achieve professional-quality results by following the correct layer sequence and specifications. The key requirements are access to basic equipment (plate compactor, laser level, landscape rake, utility vehicle), willingness to follow technical specifications precisely, and realistic time allocation—most 60x120 foot arena installations require 40-60 hours of labor. The arena construction guide provides additional technical details for self-builders.
What equipment do I need for DIY arena footing installation?
Essential equipment includes a vibratory plate compactor (rentable), laser level or transit, landscape rake, utility vehicle or small tractor, box blade or grading implement, and measuring tools. For larger arenas, a skid steer significantly speeds material spreading. The Arena Drag handles ongoing maintenance once installation is complete. Total equipment rental costs typically run $500-1,500 depending on project duration and local rates.
How long does DIY arena footing installation take?
A typical 60x120 foot arena requires 40-60 hours of labor spread across 1-3 weeks, depending on site conditions and helper availability. Subgrade preparation takes 8-16 hours, geocell installation 8-12 hours, and footing application 8-12 hours. Weather delays, soil issues, and drainage requirements can extend the timeline. Most DIY builders complete the project over 2-3 weekends with weekday work sessions for time-sensitive steps like compaction.
Is DIY arena installation cheaper than hiring a contractor?
DIY installation typically saves 30-50% compared to full contractor installation, with savings coming primarily from labor costs. Materials represent 50-70% of total project cost regardless of installation method—request a quote to price materials for your specific dimensions. The Performance Footing team can provide material packages with detailed installation guidance, giving you contractor-quality specifications with DIY labor savings.
Conclusion
The research is clear: arena surface engineering directly affects equine soundness, performance, and long-term health. A properly installed arena—with each layer in the correct sequence, specified to your site conditions, and customized for your discipline—provides a surface that supports your horse's athletic potential rather than compromising it.
DIY installation is absolutely achievable for horse owners willing to follow technical specifications and invest the necessary time. The five-layer stack—compacted subgrade, optional drainage stone, geotextile membrane, BaseCore geocell, and custom footing blend—creates a system that performs for years with proper maintenance. Skip layers or misorder the sequence, and you'll create problems that are expensive and disruptive to correct.
Performance Footing provides everything you need for a successful DIY installation: geocell panels, geotextile fabric, ArenaSpec footing additives, edge containment systems, and maintenance equipment—plus the technical guidance to put it all together correctly. Request a quick quote for your project dimensions, or call 877-835-0878 to discuss your installation with the team that's helped thousands of arena owners achieve professional-quality results.
This article is for informational purposes only. The information provided reflects published equestrian research, FEI and governing-body guidelines, and Performance Footing's product expertise. Surface conditions, climate, soil type, and facility use vary widely—consult Performance Footing or a qualified arena builder for site-specific recommendations. For current product information, pricing, and availability, visit performancefooting.com or call 877-835-0878.4
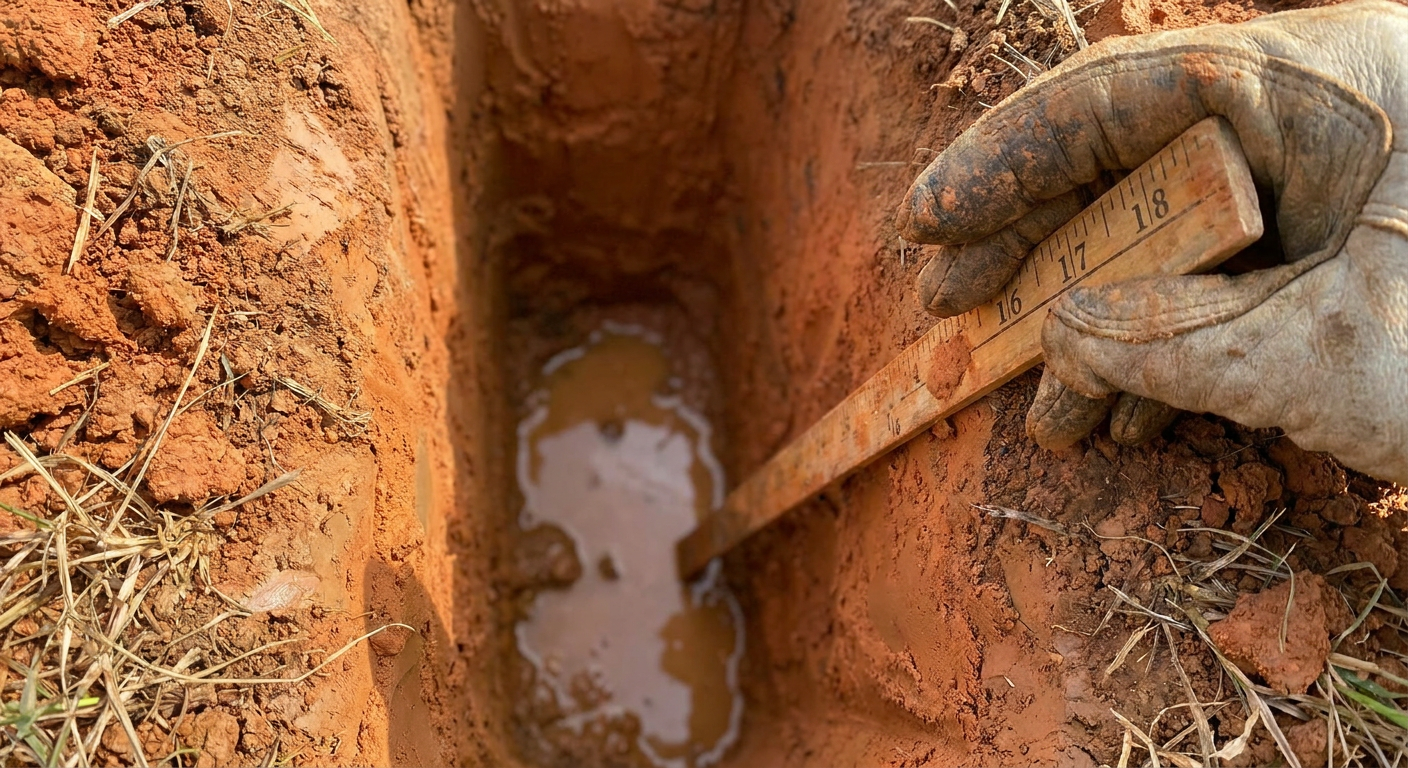
A simple percolation test determines if your site needs an additional engineered drainage stone layer.