A horse arena is built in four engineered layers: compacted subgrade, free-draining stone sub-base, a stabilization layer (BaseCore® geocell or arena mats), and your blended footing on top. Outdoor builds run $35K–$120K, indoors $150K–$500K+. Skipping base stabilization is the single biggest reason arenas need rebuilding within three years.
The Construction Process
Building a riding arena is a lot more complicated than just its top layer. You'll need to budget and plan for what kind of arena you want to create. It's important to factor in what you want to use your arena for, as this can determine what size, what kind, and what budget you'll need to make your arena dreams a reality.
Building a Horse Arena Can be a Significant Undertaking. If you've thought about building your own arena there are a few things you need to know before you start the process. To help you, we've created this complete arena construction guide to walk you through what you need to know and some common pitfalls when creating your dream horse arena.
Whether you're building a private facility, a professional training center, a competition venue, or a collegiate program, the fundamentals remain the same — only the specifics change.
In This Guide:
- 01.Indoor, Outdoor & Covered Riding Arenas
- 02.What Size Should an Arena Be?
- 03.Where to Build a Riding Arena
- 04.Arena Planning Permits
- 05.Arena Drainage
- 06.The Importance of a Solid Arena Base
- 07.Arena Mats
- 08.Creating the Ideal Riding Surface
- 09.Footing Additives: The Performance Footing System
- 10.Dust Reduction
- 11.Waterless Arena Footing Options
- 12.Borders and Fencing for a Riding Arena
- 13.Arena Costs and Maintenance
Indoor, Outdoor & Covered Riding Arenas
The first decision you'll need to make when designing your horse arena is whether to build an indoor, outdoor, or covered arena. Each type has its advantages and disadvantages, but knowing which you need will help you answer a lot of future questions about what size and materials you'll need to create your dream arena.
Outdoor Arenas
Outdoor arenas can be cheaper to build. They also give you and your horse the opportunity for fresh air and unobstructed views. However, outdoor arenas might require additional maintenance over time. Depending on the climate where you live, outdoor arenas can limit when you can use your arena. If you prefer to build an outdoor arena but are concerned about weather, you can add a cover later to help protect your arena from the elements.
Indoor Arenas
Indoor arenas are ideal for serious riders. They are protected against the elements, creating a long-lasting riding area. Indoor arenas enable you to ride throughout the year, regardless of weather. However, they can also incur more costs and need more space than an outdoor arena. You'll need to factor in additional costs for electricity and climate control. You will also need to provide additional space to create room for the structure that will enclose your arena. If you intend to use your arena for jumping you will also need to consider how tall to make your structure.
Covered Arenas
Covered arenas offer a middle ground between indoor and outdoor facilities. A roof structure — typically steel-framed with open or partially open sides — shields riders from rain and direct sun while maintaining natural airflow and ventilation. Covered arenas are significantly less expensive than fully enclosed indoor arenas because they don't require walls, climate control, or lighting during daylight hours. They're particularly popular in regions with heavy rainfall or intense sun, and they dramatically reduce dust issues compared to fully open outdoor arenas. Many facilities start with an outdoor arena and add a cover structure as a cost-effective upgrade.
What Size Should an Arena Be?
Arena dimensions depend on what type of arena you aim to build. If you have the space, a larger arena gives you more room to ride and reduces wear, since being more confined to smaller spaces causes you to ride over the same area more often. Unfortunately, a larger arena is also more expensive. To determine what size you need you can factor in the standard sizes for arenas by discipline.
If you intend to use your arena for dressage competitions or other events, check USEF's guidelines for competition dimension requirements. Remember that this will vary by sport.
Dressage (Small and Large)
Small dressage arenas are 20×40 meters long, which is 66×131 feet. Standard-size dressage arenas are larger, at 20×60 meters long or 66×197 feet.
Learn more about dressage footing →Hunter/Jumpers
The size of an arena designed for hunters and jumpers depends on the rider. Premier Hunters will need a larger arena than Local Hunters. Similarly, 5/6 Jumpers will need more space than Level 1 Jumpers. A minimum of 100×200 feet is recommended, though larger facilities use 150×300 feet.
Western / Reining / Cutting
Reining and cutting arenas should be at least 100×200 feet, with 150×300 feet preferred for competition. Barrel racing requires enough room for the standard cloverleaf pattern with adequate run-out space — typically a minimum of 130×200 feet.
Eventing
Eventers need a versatile arena for dressage work and show jumping phases. A 20×60m dressage court plus a separate jumping warm-up area is ideal. Cross-country courses are built on separate land but the home arena should accommodate flatwork and gymnastics at a minimum of 66×197 feet.
Driving
Driving arenas require wider turning radii than ridden disciplines. A minimum of 100×200 feet is recommended, with larger dimensions for combined driving obstacle practice. Consider wider gate openings and gentle, sweeping corners in your arena layout.
Polo / Sport Horse
Polo practice arenas should be at least 150×300 feet, though regulation outdoor polo fields are significantly larger. Sport horse arenas used for breed shows and in-hand classes can follow standard all-purpose dimensions of 100×200 feet.
All-Purpose / Multi-Use
Multi-purpose arenas are typically larger to accommodate full-jump courses. An all-purpose arena is typically 100×200 feet, which is 34 feet wider than a standard dressage arena. This is the most versatile option for facilities hosting multiple disciplines.
Where to Build a Riding Arena
Once you've chosen a size for your arena, you're ready to pick a location. You'll need to find an area that offers the amount of space you're looking for. If you own stables, keep in mind how far your arena is from your horse.
Finding a location that needs less leveling and excavation will help you to keep costs down. The less work that needs to be done to a location, the cheaper it will be. You'll also want to consider the potential for flooding. A valley might not be the best place to build, as your arena might frequently end up underwater. For outdoor arenas, an area that enjoys a lot of sun exposure can help dry your arena after rainfall.
Arena Planning Permits
After you've planned out your arena design you can begin filling out the necessary permits.
The planning application will require details of your construction project, so you'll want a well-thought-out idea of what your arena will look like and what you'll need to build it. You won't be able to begin construction on your arena until you've gotten approval so be sure to apply well in advance of when you aim to begin building.
Arena Drainage
Proper drainage is a crucial step in building a riding arena. Effective drainage systems will help maintain the quality of your arena. Drainage issues can cause poor performance and increase wear on your arena, which can create additional costs and maintenance later on. The type of drainage system you use will depend on whether you're building an indoor or an outdoor arena.
French Drains
French drains are one of the most common drain types used for outdoor arenas. They are comprised of trenches containing drainage pipes that allow water to flow outside your arena. If you're looking for a simple and effective drainage solution for your outdoor area, French drains might be a good option.
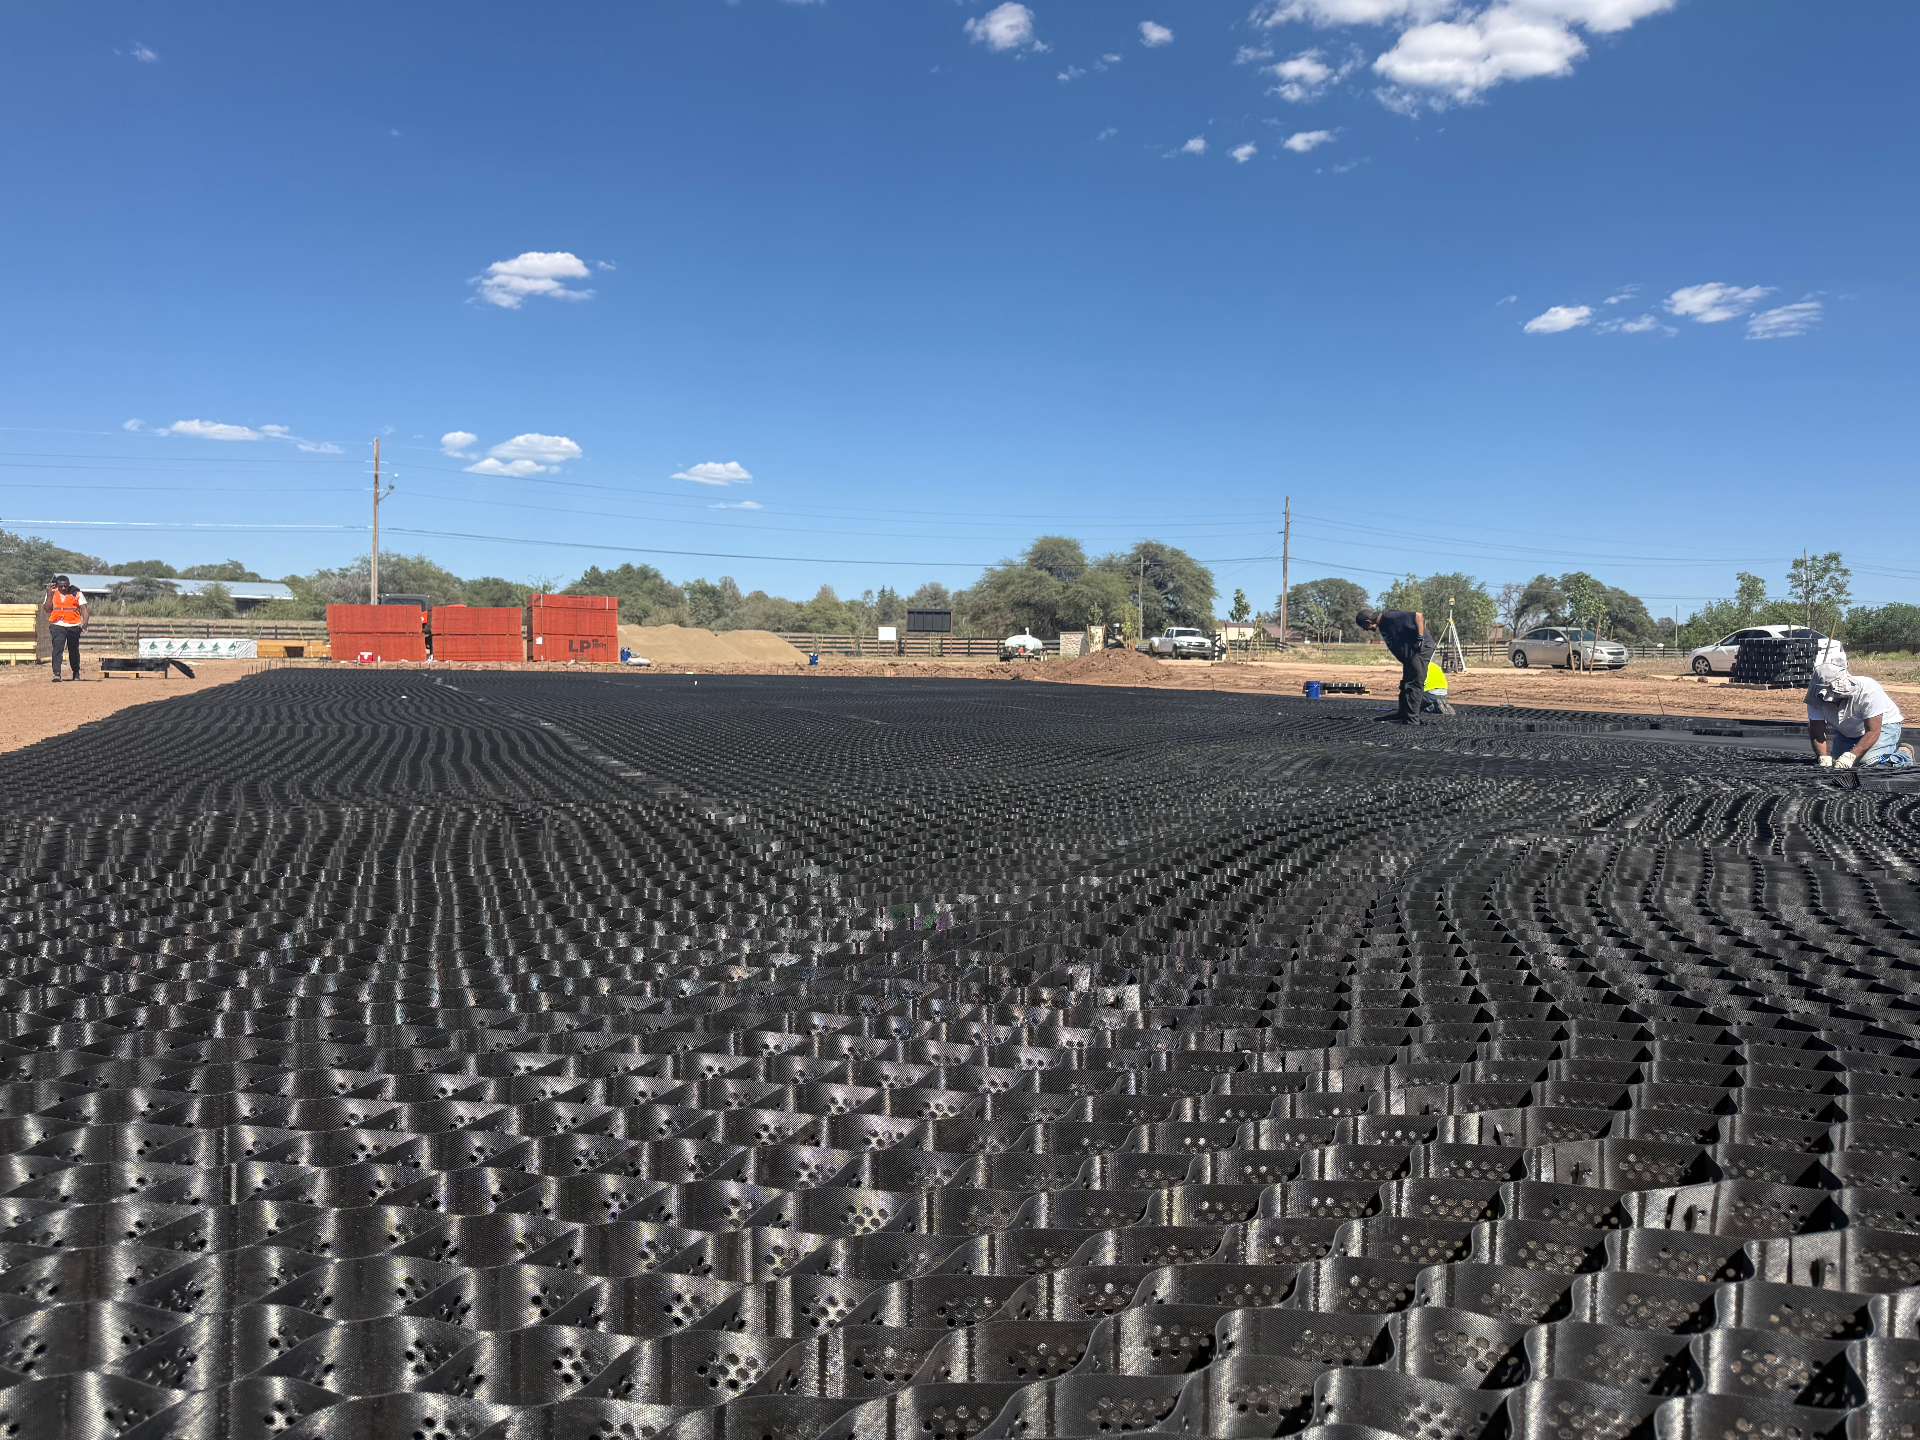
Geocell (BaseCore)
Adding geocell can increase stability for your horses. It serves as a permeable foundation that works with your drainage system to add structure and prevent erosion. Geocell stabilizes an arena to prevent sinking and provides your horse with a level, consistent footing. Benefits include: stopping mud, erosion control, preventing sinkage, stabilizing the ground, ⅓ less base excavation depth, preventing arena flooding, and creating a sturdy foundation.
Explore ground stabilization solutions →The Importance of a Solid Arena Base
Creating a strong and stable arena begins with its base. The base is one of the most important factors in an arena, as it serves as the foundation. The base of an arena supports your horses, so any uneven surfaces or ineffective materials can impact performance or cause injury.
Indoor vs Outdoor Bases
Both indoor and outdoor bases should provide suitable stability, traction, and shock absorption. However outdoor bases should also remain considerate of drainage solutions. Outdoor arena bases need to be permeable to prevent flooding from rainfall and runoff, and do drain quickly in order to allow you to ride sooner.
Woven vs Non-Woven Membrane
Geotextile membranes are used to separate your base layer from your sand and arena footing. Woven geotextiles are similar to weed cloth and are rarely used in the arena construction process. If you use BaseCore geocell, you would only need to use a non-woven geotextile on the compacted sub-base, then add the BaseCore geocell layer. The non-woven geotextile will allow for drainage and provide stabilization for the entire arena.
Rock Types for Arena Bases
Arena bases are made up of different types of stone and gravel. The types of crushed rocks used affect how hard your base is. We recommend angular stones, which create a better grip than alternative base materials.
Construction Process and Layers
Arenas typically include a base and a subbase layer. The lower section of the base is made of a permeable composition of rocks and gravel. A geocell like BaseCore can be placed above the subbase material. Riding arena bases are usually comprised of 4-6 inches of compacted, well-graded materials. The base material, such as crushed stones, is introduced and compacted by a 10-ton roller. The base needs to be thoroughly compressed to prevent any uneven surfaces.
Arena Mats
Arena mats are interlocking rubber mat systems designed to sit on top of your BaseCore geocell or directly over a compacted subbase. They serve as the critical transition layer between your base and your riding surface, providing drainage, shock absorption, and structural support.
Drainage
Perforated design lets water pass through — ride sooner after rain or watering
Shock Absorption
Rubber composition absorbs impact, reducing concussion on joints and tendons
Rebound
Returns energy for a responsive surface that horses move freely on
Less Sand Needed
Reduce footing depth by ½–1 inch, saving on sand and additive costs
Prevents Migration
Keeps sand from migrating into the base — less frequent footing replacement
Flexible Install
Goes on BaseCore geocell or directly over compacted subbase
Typical installation stack: Compacted subgrade → Geotextile → Stone base or BaseCore geocell → Arena Mats → Sand + additive footing
What Are Arena Mats?
Arena mats are heavy-duty, perforated rubber mats — typically 1–2 inches thick — that interlock to form a continuous layer across your entire arena floor. They're engineered to allow water to pass through while providing a consistent, level surface for your footing material to sit on. Unlike hard stone bases that can shift or create pressure points, mats distribute load evenly and add a degree of rebound to the riding surface.
Where They Go in the Build
Arena mats are installed after your compacted base layer. If you're using BaseCore geocell, the mats go on top of the filled and compacted geocell. If you're building without geocell, they go directly on your compacted stone subbase. Your sand and footing additive layer then sits on top of the mats. The typical stack is: compacted subgrade → geotextile → stone base or BaseCore geocell → arena mats → sand + additive footing.
Drainage Benefits
The perforated design of arena mats allows water to pass through vertically while the mat itself doesn't absorb moisture. This means your footing drains faster after watering or rain, and you can ride sooner. Combined with proper base drainage (French drains or geocell), mats create a system where water moves down through the footing, through the mats, and out through the base — keeping your riding surface at the right moisture level.
Shock Absorption & Rebound
The rubber composition of arena mats provides meaningful shock absorption that a stone base alone cannot. When a horse's hoof strikes the footing, the energy passes through the sand layer and hits the mat — which absorbs a portion of the impact and returns it as rebound. This reduces concussion on joints and tendons, particularly valuable for high-impact disciplines like jumping, reining, and barrel racing. Riders often report that their horses move more freely and with greater confidence on surfaces with mat systems.
Reduced Footing Depth & Cost
Because arena mats provide structural support and some cushioning of their own, you can often reduce your sand footing depth by ½ to 1 inch compared to arenas without mats. Over the area of a full arena, this translates to significant savings on sand and additive material. The mats also prevent sand from migrating into the base layer, which means you replace footing less frequently.
Ideal Use Cases
Arena mats are especially valuable for high-traffic facilities, competition arenas, and therapeutic riding centers where consistent footing and reduced concussion are priorities. They're also excellent for covered and indoor arenas where you want maximum performance from a thinner footing layer. For budget-conscious builds, mats can be installed in high-traffic zones only — such as the track line and landing zones — and expanded over time.
Creating the Ideal Riding Surface
Finding the right footing is necessary to achieve the highest performance level and to create a healthier and safer riding environment for you and your horse. To achieve the best ride, there is no one-size-fits-all footing option. Consider what you intend to use your arena for and if you decide to go with a sand base, what local materials are available. Keep in mind the transportation costs associated with sand types, some might be easier to access in your area than others.
Sand Types
There are several sand options for arenas, and some arenas end up using a blend of two or more sand types. When selecting any sand, ensure that it is a sub-angular sand and has a varied sieve analysis of particles. It's important not to use round particles or beach sand for your arena. Sand particles must be angular to create stability and cushioning for your horses.
Masonry Sand
Masonry sand is one of the most versatile arena sand options. It is usually ground finely and uniform in texture, which makes it a great option for dressage arenas. Dressage arenas, and any areas where jumping is a common practice, are better suited for more finely grounded sand.
Concrete Sand
Concrete sand, also called River Sand, has a similar construction process as masonry sand. Concrete sand, however, is ground less finely, resulting in a coarser texture. Coarse texture sand is ideal for creating traction for your horses, providing a good option for riding arenas.
Other Sand Types
Silica sand is a harder sand that takes longer to break down and therefore also emits less dust particles. Manufactured sand is made from larger aggregate materials that are broken down into sand particles. This can be done to a variety of particle sizes and textures, depending on your arena needs.
Calculate how much sand you need →Footing Additives: The Performance Footing System
Footing additives blend with your arena sand to soften horses' impact, reduce compaction and stabilize the footing. It also helps prevent small sand particles from releasing into the air as dust. Rather than a single product, the right approach is a customized system — combining specific elements based on your discipline, climate, and performance goals.
Our system is built on three core products — each solving a specific performance problem. Your arena gets a custom blend based on your discipline, climate, and goals:
Fibr
Stability & Traction
Helps improve traction, shear control, and surface integrity so the footing stays more secure under load, resists blowing out, and feels more consistent through turns, transitions, and repeated traffic.
Flex
Cushion & Rebound
Helps keep the surface from feeling flat, hard, or overly compacted by improving give, energy return, and overall comfort under foot.
Lock
Moisture & Consistency
Helps manage dust, support more uniform moisture behavior, and reduce the day-to-day swings that make a surface ride too dry, too loose, too firm, or inconsistent across the arena.
Every facility is different. We design a custom additive blend based on your specific needs — there's no generic formula. Learn more about our footing approach →
Rubbers and Yoga Mats
Yoga mat footing is proving a powerful footing solution for many different arena compositions and riding styles. Rubber and yoga mat-based footing additives are helpful in reducing compaction within the footing. These eco-friendly, low-cost, and low-maintenance options create better cushioning for horses. They bind with your sand, are hypo-allergenic and hold onto some moisture to reduce dust and watering.
Man-Made Textiles and Fibers
Synthetic footing is any footing additive composed of man-made materials. It is often made from textiles and fibers, which can create good cushioning. These materials require a lot of water to maintain their effectiveness. Most contain plastics and require specialized drags to groom the arena and a labor-intensive installation process.
Plastic-Free Fiber Footing
Plastic-free fibers are high-performance, sustainable footing additives. They are more environmentally friendly than synthetic footing, safer for your horses and watersheds. These sustainable footing solutions are made of natural materials and can decrease your water usage and reduce dust.
Wood Chips
Wood chips are a popular cheap footing option. They are absorbent and soft to create cushioning and allow drainage. It can be a good option for starting your arena off on a budget, however this also comes at a price known to create more dust and require more watering.
Dust Reduction
We've already discussed how footing additives can help reduce dust but for a more targeted solution, you might want to consider additive products created specifically for arena dust reduction. Having too much dust when you ride in your arena not only decreases performance, it can be a health hazard for both the rider and the horse.
Lock — Moisture & Dust Control
Lock is our dedicated dust-control element. It binds to sand particles and retains moisture, preventing fine particles from becoming airborne. Unlike salt-based solutions that can dry hooves and corrode metal, Lock is safe for animals and equipment. It works in both indoor and outdoor environments. Lock works to bind the smaller particles together so that they become too heavy to become airborne — requiring less water while sustaining its effectiveness.
Flow — Wetting Agent
Flow is a professional-grade wetting agent that ensures water penetrates your footing evenly rather than sheeting off the surface. It maximizes the effectiveness of every drop of water you apply, reducing overall water usage while keeping dust suppressed. Combined with Lock, it creates a comprehensive moisture management system.
MAG Flakes
MAG flakes are a common solution for humid and freezing temperatures in indoor arenas. It is comprised of salt and magnesium chloride flakes to reduce dust and control temperatures. However, you cannot add water to your arena or the MAG flakes will dissolve. The salt can also dry horse hooves and produce rust. MAG flakes cannot be used in outdoor arenas.
Waterless Arena Footing Options
Watering your arena can get tiresome and expensive. In some areas, watering is not even an option with new regulations and lack of availability. Waterless footing is a lower-maintenance footing option.
Organic Waterless Footing
By combining Flex (our USDA Certified Biobased cushion element) with Fiber for stability, you can create a footing system that requires significantly less — or even zero — watering. The organic materials retain the right amount of moisture naturally while preventing dust. This approach is ideal for drought-prone regions and facilities looking to reduce water costs.
Wax-Based Footing
Wax-based footing is a low-maintenance solution for reducing watering. Wax-coated sand can help you cut out water usage entirely. However, arenas exposed to higher heat levels are not suited for wax-coating, as the high temperature can compromise the coating.
Borders and Fencing for a Riding Arena
Because indoor arenas are enclosed, fencing is only needed if you're building an outdoor arena.
Fences around the sides of the arena can be made of wood but, if you're looking for a sturdier option, you can find fences made from steel and other metals. All arenas are recommended to have a border in place, to hold in the footing and sand. These can be as simple as using railroad ties or pressure treated wood options.
Arena Costs and Maintenance
Building your dream arena is exciting, but it can get expensive. It's important to factor in your budget when deciding between materials.
On average, an outdoor arena costs between $1 to $10 per square foot, depending on your materials. Indoor arenas will have a similar cost, plus the cost of the overall structure. The higher quality materials you use, the higher-quality arena you have. But you'll also incur more costs. Consider what you need to use your arena for and what you're willing to pay for it. Plan out your budget ahead of time to know what your arena will cost to build and maintain.
Explore maintenance equipment →Download This Guide
Save the complete Arena Construction Guide as a branded PDF — perfect for sharing with your builder, board, or team.
Build for Your Discipline
Every discipline has unique footing requirements. Explore discipline-specific guidance for your arena build:
Frequently asked questions
The most common questions we get about scoping, sizing, budgeting, and building a horse arena that lasts.
Pillar: Arena Construction & Base
Construction & base guides
All-Weather Arena Construction: Year-Round Riding Solutions
Build an all-weather arena that handles freeze-thaw cycles, excessive rain, and drought. Learn proven strategies from documented facility installations.
Arena Base Problems: Solutions by Performance Footing
Deep spots keep returning despite grooming? The problem is your base. Install BaseCore or build it right to fix arena base problems.
Arena Builders vs Footing Experts: Best 1 Performance Footing
Who do you think could build arenas that give long-term solutions? See the difference between arena builders vs footing experts and why we consistently deliver.
Arena Commissioning: Your First 30 Days Guide | Performance Footing
Master your new horse arena's critical first 30 days after arena commissioning. Learn essential break-in protocols, footing settling tips, and maintenance.
Building a Horse Arena on a Budget | Riding Arena Construction
When building a riding arena, saving pennies and an arena that will last is always a consideration. Here are the tips on building a horse arena on a budget.
#1 Top best California Horse Arena Builders | Performance Footing
The traditional arena construction is no longer sustainable. Here's why California horse arena builders choose Performance Footing for safer arenas.