
Every equestrian facility owner eventually faces the same frustrating reality: an arena that looked perfect during construction developing soft spots, drainage failures, and dangerous footing within just a few years. The culprit in approximately 80% of arena failures traces back to one critical oversight during construction—inadequate compaction testing of the base layers. Understanding how proper compaction testing works transforms arena construction from guesswork into engineering precision, whether you’re building a professional training facility or a backyard paddock.
What Compaction Testing Reveals About Your Arena Base
Compaction testing measures how densely soil particles pack together when mechanical force is applied, directly determining whether your base can support horses, equipment, and decades of use without shifting or settling.
The industry standard, known as the Proctor compaction test, was developed by engineer Ralph Roscoe Proctor in 1933 while working on dam construction projects. According to ASTM D698, this laboratory method determines the optimal moisture content at which soil achieves its maximum dry density—the point where particles lock together most effectively. The test involves compacting soil samples at various moisture levels in a standardized mold, then plotting the results to identify the peak density achievable for that specific material.
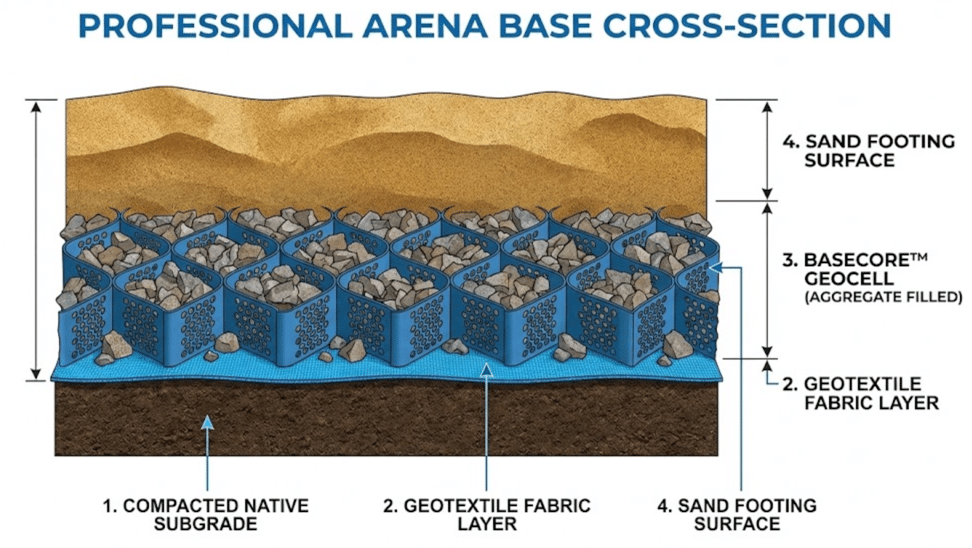
For arena construction, the standard specification requires achieving 95% of the Proctor maximum dry density. This benchmark appears consistently across equestrian construction literature. According to published arena construction guidelines, riding arena bases typically require 4-6 inches of compacted, well-graded materials, with the base material compacted by a 10-ton roller. The 95% Proctor standard ensures the base won’t continue settling under the repeated impact of hooves and equipment.
The Modified Proctor test (ASTM D1557) uses higher compaction energy—a 10-pound hammer dropped from 18 inches rather than the standard 5.5-pound hammer from 12 inches. This modified approach produces higher maximum densities at lower moisture contents, making it appropriate for applications expecting heavier loads.
How Performance Footing and Ground Shapers International Engineered a Century-Long Solution

Stephens College in Missouri, celebrating their 100-year anniversary in 2026, invested in BaseCore HD technology for their arena base reconstruction with an explicit goal: engineering a foundation designed to serve the next century of equestrian excellence. Their approach demonstrates how professional teams balance compaction science with modern reinforcement technology.
The Performance Footing team, working alongside Ground Shapers International, began with comprehensive subbase evaluation including soil classification, permeability testing, and bearing capacity analysis. They identified locally available aggregate sources within economical hauling distance and conducted laboratory sieve analysis to determine optimal gradation. Their final blend combined 2-inch minus base rock from a limestone quarry with 3/8-inch minus angular granite, achieving a target California Bearing Ratio (CBR) of 80 while maintaining permeability exceeding 20 inches per hour.
Installation followed a systematic process with each 4-inch lift verified before proceeding. The Performance Footing and Ground Shapers International team used nuclear densometer testing at 50-foot grid intervals to confirm uniform compaction throughout the project. By incorporating BaseCore HD geocell reinforcement, the installation reduced aggregate requirements by 40-50% compared to traditional methods while achieving superior load distribution.
The Stephens College project reflects a growing industry understanding that proper base engineering eliminates future failures. When facilities use engineered base systems incorporating cellular confinement, they report consistent patterns of reduced maintenance requirements. Analysis suggests properly engineered bases maintain infiltration rates exceeding 10 inches per hour even after years of use, compared to 2-3 inches per hour for conventional bases—a critical factor for arena usability after rainfall.
Professional Field Testing Methods That Verify Compaction Quality
While laboratory Proctor tests establish the target density, field verification confirms whether construction actually achieved those specifications. Three primary methods provide this verification, each with distinct advantages.
Nuclear Density Gauge Testing
The nuclear density gauge represents the industry standard for field verification. According to ASTM D6938, this portable device uses gamma radiation to measure both wet density and moisture content simultaneously. A cesium-137 source emits radiation through the compacted material, with detectors measuring how much passes through. Denser materials allow less radiation transmission, enabling direct density calculation.
Nuclear gauge testing offers significant advantages for large projects: tests complete in approximately one minute, one trained operator can perform dozens of tests daily, and results correlate directly to laboratory Proctor values. The Performance Footing and Ground Shapers International team used nuclear densometer testing at 50-foot grid intervals at Stephens College to verify the entire arena achieved specification.
However, nuclear gauges require state and federal permits, operator certification, and careful handling protocols due to the radioactive source. For smaller projects or ongoing monitoring, alternative methods may prove more practical.
Dynamic Cone Penetrometer (DCP) Testing
The Dynamic Cone Penetrometer provides rapid field assessment of soil strength without radiation concerns. According to ASTM D6951, this manually operated device drives a cone into the ground using an 8-kg hammer dropped from a standardized height. The penetration rate—measured in millimeters per blow—correlates to in-situ California Bearing Ratio values and bearing capacity.
Research published in transportation engineering journals demonstrates strong correlations between DCP results and laboratory CBR, with correlation coefficients (R²) reaching 0.89-0.94 depending on soil type. The test identifies weak zones that laboratory sampling might miss, providing a strength profile through multiple soil layers.
For arena applications, DCP interpretation follows general guidelines: penetration rates below 10 mm/blow indicate very firm conditions suitable for arena loading, rates of 10-20 mm/blow suggest adequate support with attention to moisture management, and rates exceeding 20 mm/blow identify soft zones requiring improvement before construction proceeds.
The DCP excels at mapping variability across large areas. By testing a grid of 12-20 points for a standard arena, construction teams identify localized soft pockets requiring targeted remediation rather than overbuilding the entire project.
Sand Cone Method
The sand cone method (ASTM D1556) provides direct density measurement without radiation. The procedure involves excavating a small hole in the compacted material, determining the hole’s volume using calibrated sand, weighing the excavated material, and calculating density from the mass-volume relationship.
While more time-consuming than nuclear testing, the sand cone method requires no special permits and provides laboratory-grade accuracy. Many specifications accept sand cone results as equivalent to nuclear gauge measurements for compliance documentation.
Simple At-Home Evaluation Methods for Homeowners
Not every arena project requires hiring a geotechnical engineer from day one. Homeowners can perform several inexpensive screening tests to identify potential problems before investing in professional evaluation or construction.
Proof-Roll Rut Test (Cost: $0)
Drive a loaded pickup truck or UTV across your proposed arena site in a grid pattern after watering the surface (damp, not flooded). Any visible pumping, washboarding, or ruts that don’t rebound indicate the subgrade lacks adequate stability. This simple test reveals soft zones that would cause problems regardless of what base materials you add on top.
Ring Infiltration Drainage Check (Cost: $15-30)
Push a 6-inch PVC ring (or coffee can with both ends removed) approximately one inch into the surface. Add a measured depth of water (one inch works well) and time how long it takes to drain completely. Repeat in several locations across the site. Drainage times exceeding 30 minutes per inch suggest poor permeability that will cause water to pool beneath your footing layer—a primary cause of arena failures.
Penetration Strength Mapping (Cost: $0-50)
A simple 3/8-inch steel rod pushed by body weight provides crude but useful comparative data. Walk a grid across your site, pushing the rod at consistent intervals and noting how easily it penetrates. Areas where the rod sinks easily under the same pressure indicate soft zones requiring attention. While this won’t give you engineering numbers, it creates a comparative map showing where problems exist.
The Squeeze Test for Moisture
Grab a handful of your proposed base material and squeeze it firmly. At proper moisture content for compaction, the material should hold together in a lump that breaks cleanly into two pieces when bent. Material that crumbles immediately is too dry; material that oozes water or stays in a solid ball is too wet. This simple test helps identify when conditions favor effective compaction.
Jar Sedimentation Test for Sand Quality
Place a fistful of proposed arena sand in a clear jar, fill with water, shake vigorously, and let settle for 24 hours. Distinct layers reveal how much fine silt and clay hide inside the blend. Less layering means cleaner, lower-dust sand that will perform better as footing. This simple test can prevent purchasing sand that will cause dust problems or pack too tightly.
Professional Analysis from Performance Footing
For homeowners wanting definitive answers without navigating geotechnical testing independently, Performance Footing offers consultation services that evaluate your specific site conditions. Their team can analyze soil samples, recommend appropriate base designs for your soil type and climate, specify materials available from local suppliers, and provide construction guidance tailored to your project scope.
Performance Footing’s engineering team analyzes site conditions, identifies local material options, and designs base systems balancing performance with budget. Whether you need a full site evaluation or guidance on interpreting your at-home test results, their expertise transforms uncertainty into actionable construction plans.
Contact Performance Footing at 877-835-0878 or through their website to discuss site evaluation options. Their free consultations help calculate exact material needs and create construction plans matching your budget and performance goals—whether you’re building a professional training facility or a backyard arena for family riding.
Measurable Outcomes: What Proper Compaction Testing Delivers
Facilities implementing engineered base systems with verified compaction report quantifiable improvements across multiple metrics.
Material Cost Reduction: Using geocell systems like BaseCore HD reduces aggregate requirements by 40-50%. For a standard 20,000 square foot arena, this translates to approximately 400 fewer tons of aggregate, representing savings of $8,000-15,000 depending on local material costs.
Drainage Performance: Properly compacted and engineered bases maintain infiltration rates exceeding 10 inches per hour even after years of use. This superior drainage eliminates standing water within 30 minutes of heavy rainfall—a critical factor for facilities needing consistent training schedules regardless of weather.
Maintenance Intervals: Professional installations with verified compaction require base maintenance every 10-15 years versus 3-5 years for conventional construction. The permanent nature of properly constructed bases means footing replacement involves only the surface layer; the base remains functional indefinitely.
Surface Consistency: When footing depth varies across an arena—deeper in corners, shallower along rails—horses adjust their movement constantly, increasing fatigue and injury risk. Stable, uniformly compacted bases maintain consistent footing depth throughout the riding surface.
The Stephens College investment explicitly targeted 50+ year structural performance, reflecting how proper compaction testing transforms arena construction from periodic reconstruction into one-time infrastructure investment.
Comparing Construction Approaches: Compaction Requirements by Application
Different equestrian applications require tailored compaction approaches based on loading patterns, drainage needs, and expected use intensity.
Riding Arenas
Arena bases require the highest compaction standards due to concentrated hoof impact and equipment traffic. The industry standard specifies 4-6 inches of crushed stone base compacted to 95% Proctor density with 1-2% slope for drainage. Penn State Extension research confirms that a highly compacted subgrade is necessary to assure good performance for the all-weather surface above it.
Indoor arenas face additional considerations: without rainfall to test drainage, moisture management during construction becomes critical. The target moisture content window of 2% either side of optimum requires careful monitoring during compaction.
Paddocks and Turnouts
Paddock construction follows similar principles but often covers larger areas with more variable terrain. According to Penn State Extension guidelines for all-weather paddock construction, the subgrade must be stripped of all vegetation, stones, roots, and organic matter before compaction. This site preparation typically removes 6-12 inches of native material.
The construction sequence for paddocks emphasizes drainage slope (1-2% minimum) before compaction verification. Unlike arenas where precise levelness matters, paddocks benefit from deliberate grading that directs water away from high-traffic zones near gates, feeders, and shelters.
Runs and High-Traffic Areas
Gate areas, paths between paddocks, and locations around water sources experience concentrated traffic that exceeds typical paddock loading. These zones benefit from the same 95% compaction standard applied to arenas, often combined with geocell reinforcement to prevent localized failure.
The compaction testing protocol for these areas should include additional test points at locations where horses naturally congregate. A single weak zone at a gate can create safety hazards and maintenance problems that spread into surrounding areas.
Practical Implementation: Step-by-Step Compaction Testing Protocol

Based on documented methodologies from successful implementations like the Stephens College project, the following protocol ensures verifiable compaction quality.
Step 1: Initial Site Assessment
Before investing in laboratory testing, conduct at-home evaluation using the proof-roll, infiltration, and penetration tests described above. Document problem areas and overall site conditions. This screening step identifies whether standard construction methods will likely succeed or if professional site evaluation should come first.
Step 2: Material Testing (Week 1-2)
Collect representative samples of proposed base materials for laboratory Proctor testing. This establishes maximum dry density and optimum moisture content targets. Cost: typically $100-250 per material tested at commercial soils laboratories. Performance Footing can assist with material selection and testing coordination.
Step 3: Subgrade Evaluation
For projects where at-home testing revealed concerns, conduct DCP testing across the project area at 50-foot intervals. Document penetration rates to identify soft zones requiring remediation. Remove all organic material and grade subgrade to design slope before proceeding.
Step 4: Compaction Specification
Specify 95% of standard or modified Proctor density based on project requirements. Include moisture content limits (typically optimum ±2%) and lift thickness requirements (4-6 inches maximum per lift for most equipment).
Step 5: Field Verification Schedule
Establish testing frequency based on project size: minimum one test per 2,500 square feet, additional tests at grade transitions, edges, and high-traffic zones. Document test locations on as-built drawings for future reference.
Step 6: Remediation Protocol
When tests reveal inadequate compaction, remediation options include additional compaction passes with moisture adjustment, removal and replacement of failing material, and installation of geocell reinforcement like BaseCore HD to distribute loads across weak zones.
Step 7: Final Documentation
Compile all test results into a construction record including material certifications, Proctor test results, field density test locations and values, and any remediation performed. This documentation supports warranty claims and informs future maintenance planning.
Understanding Sand Specifications for Arena Footing
Compaction testing applies primarily to base layers, but the quality of surface footing also follows measurable specifications. Performance Footing’s sand sieve analysis provides specific gradation targets for optimal footing performance.
For outdoor arenas, the target gradation concentrates material at the #60 mesh (48.5% target retention) and #100 mesh (34% target retention) sizes. This distribution creates footing with appropriate stability while maintaining adequate drainage.
Indoor arenas require slightly different specifications to account for controlled moisture conditions and the absence of weather-related surface changes. The indoor specification adjusts retention percentages to optimize dust control and consistent footing response.
Local sand quarries can match these specifications when provided with the target gradation. Taking documented specifications to suppliers ensures the footing layer performs as intended atop properly compacted base construction. Performance Footing provides detailed sand sieve analysis charts that you can take directly to your local quarry for matching.
Frequently Asked Questions
What does 95% Proctor compaction mean for arena construction?
It means the in-place soil density must equal 95% of the maximum density achievable in laboratory testing. This standard ensures base materials won’t continue settling under use, preventing soft spots and drainage failures over time.
How much does compaction testing cost for a typical arena project?
Laboratory Proctor testing costs $100-250 per material. Field verification using DCP equipment runs $1,600-2,200 to purchase or significantly less for rental. Performance Footing offers consultation services to help evaluate your site without requiring you to purchase testing equipment.
Can I verify compaction without hiring a geotechnical engineer?
Yes. Start with at-home screening tests like proof-rolling, infiltration checks, and penetration mapping. These reveal obvious problems at no cost. For formal documentation, Performance Footing can coordinate professional testing or help interpret your findings.
How does geocell reinforcement affect compaction requirements?
Geocells like BaseCore HD distribute loads across larger areas, reducing stress on underlying soils. This allows satisfactory performance even over marginal subgrades, though proper compaction of fill material within the cells remains essential.
What causes arena bases to fail even when initially compacted correctly?
Drainage failures allowing water to saturate base layers, organic contamination from decomposing footing materials, and inadequate separation between layers cause most post-construction failures. Geotextile fabric between layers prevents material migration that undermines compaction over time.
Conclusion
The Performance Footing and Ground Shapers International team’s work at Stephens College illustrates how proper compaction testing transforms equestrian facility construction. The 95% Proctor density standard, verified through field testing and combined with modern BaseCore HD reinforcement technology, creates foundations designed to serve generations of equestrians.
The documented outcomes—40-50% material savings, decade-plus maintenance intervals, and consistent drainage performance—justify the investment in proper testing during construction. For arena owners facing recurring soft spots, drainage failures, or inconsistent footing, understanding base compaction often explains the root cause and points toward lasting solutions.
Your Next Step: Start with the simple at-home tests described in this article to screen your site for obvious problems. Then contact Performance Footing at 877-835-0878 for a free consultation. Their engineering team will help you interpret your findings, recommend appropriate base designs for your soil conditions and climate, and create a construction plan matching your budget and performance goals. Whether you’re building a century-lasting professional facility or a safe backyard arena for family riding, proper compaction testing is the foundation of success.